Modern sport bikes show up now with pretty decent stock brake components such as radial master cylinders and radial mount brake calipers. On the now-ubiquitous upside-down forks with gigantic front axles (to compensate for the lack of an old-school fork brace), radial mount calipers are aligned along the rear radius of the brake rotor and bolt onto the rear of the lower fork, as opposed to the previous iteration of front brake calipers which bolt to the side of the fork.
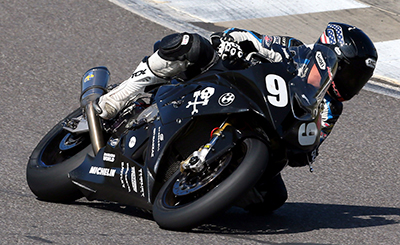
Powerful but linear brakes, a taunt chassis and Michelin tires allow Chris
Peris to trail brake to the apex on his knee. Lawson's superbike FZ750
used to spread the frame rails under hard braking so much that he could
feel it in his knees. They had to install a bolt in support between the
frame rails to prevent the flex.
Another innovation that appears on sporting production motorcycles is the radial master cylinder, which creates a stiffer lever and master cylinder assembly and offers better feel at the brake lever than the older axial master cylinders. But despite the appearance of these once exotic parts on stock motorcycle braking systems, there are still additional improvements that can be made to the brake lines, pads, and fluid.
Many manufactures still ship sport bikes with cheap, durable brake pads, rubber brake lines, and lackluster brake fluid, all of which compromise brake performance on the race track. We always replace the brake lines with braided steel lines, the brake fluid with higher temperature fluid, and the brake pads with high friction racing pads. Rule structured dependant, some motorcycles (cough GSX-R cough) will benefit from float testing the stock master cylinder and installing a higher quality unit (Brembo 19 X 18 Cast Radial Pump (under $300) has been our choice for all our bikes with 8 to 12 front pistons in the last few years).
Brake Lines
We change the front brake lines to braided steel-covered plastic lines to eliminate the expansion inherent in rubber lines. These lines allow a firmer feel at the lever and are, we feel, safer in the event that the brake line ends up rubbing on the front tire or someone else’s front tire.
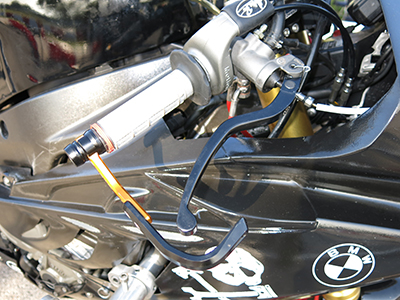
The user interface of the brake system. A Brembo 19 X 18 radial master
cylinder with safety wired pivot point (remember to stay on top of greasing
your master cylinder pivot points), a top bleed fitting, and the remote
adjuster cable disappearing off to the left bar. The lever is protected
from impact by a very reasonably priced Zeta (moto-heaven.com) protector.
On the brake line front we have tried both Kevlar lines and braided steel lines from a variety of manufacturers, and also braided steel lines of two different internal diameters. Although we have rarely had problems with any material, we have shied away from the Kevlar lines because the warnings that accompany these lines (e.g., NEVER let the calipers hang from the lines) are a little more strident than the warnings that accompany the stainless lines. Those are not the kinds of worries we want creeping into the backs of our minds when we’re trying to replace the whole brake system after a crash in under two minutes, so now we always use the braided steel lines.
We once took a spin with the assemble-your-own steel lines, which made getting the brake line length and routing perfect an easy task but sometimes the lines didn't seem to go together quite right, which would lead to sleep deprivation and more worries. It's easy now to find brake line kits with all three lines of the appropriate length for clip-ons and rearsets for almost any bike, with the fittings all crimped on nice and tight at the manufacturer. Bonne nuit et de beaux rêves...
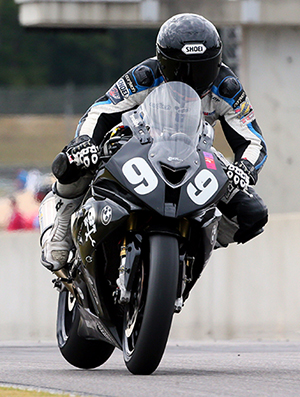
Although not something easily enhanced, the chassis
has an inextricable link to braking performance. A strong
frame headstock, appropriately stiff fork springs, stout
fork tubes and the correct fork oil level all impact brake
performance. Ben Walters is floating the rear wheel into
Barber's turn one with two hobbit fingers on the lever.
These is a little travel left in the forks so its still got some
give if he hits a bump. Photo Brian J.
In the old days the braided steel lines were shipped without any plastic coating on them, which meant they would quickly wear away at fenders, fairings, radiators or anything else with which they can come into contact. We try to buy the ones that have a clear plastic coating on them to avoid tearing up the aforementioned parts. We have also tried both the normal internal diameter brake lines and the fashionable smaller diameter lines. None of our riders could tell a difference between the two. Your mileage may vary.
Army Of Darkness is now sponsored by HEL. They are manufactured in the USA which make for high quality components and fast warranty work. We've been using them exclusively for seven years and have been very pleased with the quality and service. They also make them in all sorts of pretty colors to allow your brake lines to coordinate with your toe nail polish.
Brake Fluid
Having nice brake lines, stiff calipers and robust master cylinder won’t help you one bit if your brake fluid has bubbles in it. Fluids don’t compress much (this is for the real geeks who know that fluids will compress in some situations, although not in a brake system) while gases compress quite easily. When you pull on the brake lever, you are applying pressure at the master cylinder that is transferred through the fluid to the pistons in the calipers. If there are bubbles in the fluid, the gas will collapse before any usable pressure is exerted on the caliper pistons. Bubbles appear in the fluid for a variety of reasons, including leftovers from disassembling the hydraulic system (e.g. to replace the brake lines), from water boiling out of the brake fluid (those calipers get hot), or from the fluid itself boiling (when the calipers get really hot).
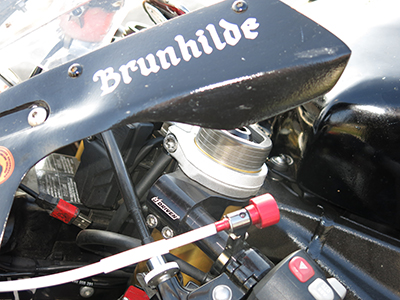
Hilde shows off her remote brake lever adjuster, perched reassuringly on
the left handlebar for easy access and adjustment (but not while braking!).
This gets us into one of those racing dichotomies where we need to trade longevity for performance. Virtually all brake fluid is hydrophilic, meaning that the brake fluid actively soaks up moisture from the air. The absorbed water is mixed into the brake fluid, which lowers the boiling point of the brake fluid. When the brake fluid in the calipers gets really hot (turn one at VIR or Summit Point), some of the liquid turns into a gas, forming little bubbles which then reduce the subsequent braking power of the system as the lever comes back further.
The silicone stuff (DOT 5) that is not hydrophilic is not a great idea because the water tends to separate out and sit around in various spots in your brake system. It also absorbs more air, and it actually compresses more than the glycol fluids.
We look for a brake fluid that has the highest dry boiling point that we can find (currently we have the top of the line Motul 660 in our tool box) but there seems to be an axiom that the higher the boiling point on the brake fluid, the more hydrophilic it is and, therefore, the more often the fluid must be changed. On the endurance bike this is every weekend. When we are just bleeding the brakes, due to the whole “boiling creates bubbles” phenomenon we like to bleed them at the track directly after a hard practice session when the calipers, fluid, and, unfortunately, the rotors are all hot. We change the fluid entirely before each race.
We have been to tracks where even the top-shelf brake fluid, or stock brake rotors for that matter, were not able to withstand the abuse. We now have a remote brake lever adjuster so that the rider can move the brake lever out to compensate if the lever starts feeling soft. Remote adjusters have historically been shockingly expensive but Moto-Heaven has a Zeta kit that is high quality and under $70. These are cheaper enough to be a standard install on anything, particularly if one of your team mates has stubbly little hobbit hands and needs to run the brake lever close to the bar.
Brake Pads
All of these heat related problems (and remember, the brakes are really just converting the kinetic energy of the race bike at speed into heat and sometimes, light) are compounded by the use of the sintered metal HH (a friction rating for brake pads) pads that we love. Many years ago it was tough to get brake pads for shiny non-rusting stainless steel OEM rotors that were really aggressive or had a high friction coefficient. At the time, builders installed gray or ductile iron rotors for the increased friction but they tended to be fragile and had a bad tendency to occasionally explode on the track, which is not the desired effect. Now that there are many really great HH pads available for stainless rotors, it is often possible to just change the pads, lines, and fluid and leave the rotors alone. We used to use EBC HH Kit pads to good effect but backing plate issues (warpage) saw us switch to Vesrah RJL Super pads for the past decade or so. These pads are so powerful, and thus create so much heat, that any weakness in the brake fluid will be revealed after a few hard laps.
The brake pads themselves have a hard life. Long single pads for (older) six piston calipers, and to a lesser extent four piston calipers, are prone to warping, so caliper and pad manufacturers are splitting the pads into sections. For instance, our BMW S1000RR has four little pads for each caliper. Brake pad manufacturers have started making pad backing plates thicker to prevent warping, sacrificing some space previously allotted for friction material in the process. We bevel the friction material to facilitate front wheel changes during pit stops, leaving even less material. That said, brakes in general, and the available upgrades, have improved dramatically in the last 20 years, so the thinner friction material hasn't been a problem. Nothing could possibly go wrong now...
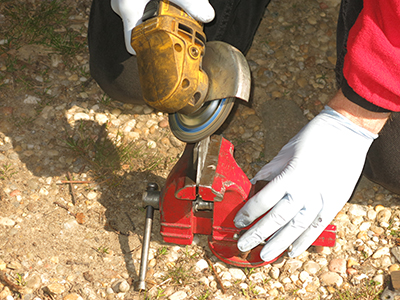
Dr. Tim Gooding uses a portable vice and angle grinder to bevel our
brake pads with surgical precision. This is a preparation really only
required by endurance racers.
But if the lever feels spongy and the fluid is good, check the pads for wear or warping. To check for pad warping, take the pads out, place them together back-to-back, and see if you can rock them against each other with your fingers or see daylight in between them. Also, on three different occasions on two different brands of bikes a year apart, we have had DP Dunlopad brake pads actually delaminate and lose part of their friction surface, so that sort of failure can happen as well.
Another culprit for spongy or non-existent brakes is the dreaded “coned” rotor. For example, Summit Point has a long straightaway into a 2nd gear right-hander. Tremendous heat is generated by our new super-duper pads (perhaps enough to instantaneously boil a cup of coffee, if the AutoPAD calculations are correct) that causes the rotor to shrink a little bit when it cools down due to some obscure metallurgical change reducing the inner diameter. With enough shrinking, the buttons that allow the rotor to float lose clearance and the rotor distorts sideways, so that the rotor is in effect a giant Belleville spring washer. Which gives the brakes a springy feel, if they work at all. The stock BMW rotors seem pretty durable but only have five places where the heat is bled through from the rotors to the wheel. With the rest of our modifications we can find the limits of the stock rotors at high speed heavy braking tracks. We have one set of fabulously expensive super-secret unobtainium rotors set aside as a remedy for those circuits.
Calipers
The unsung hero of your typical brake system is the caliper piston seals. These poor seals have to resist the brake fluid pressure and the heat, and they are responsible for ever-so-slightly retracting the brake pistons so the pads don’t drag on the rotor. They have a tough job so don’t make their lives any worse (or shorter) by pushing the pistons back into the calipers without carefully scrubbing off all the baked on brake dust with a soft toothbrush. When we re-install the calipers we pump the pistons back towards the rotor with lots of quarter to half stroke pulls on the brake lever to move the pistons slowly. This helps prevent over taxing the seals' “pull back the pistons” function and helps reduce brake drag.
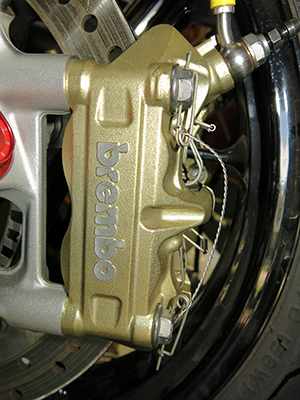
Left side radial caliper mounted and safety-wired
endurance-style with safety pin clips through the
mounting bolts to make removing and reinstalling
the calipers a little faster, while the brake line banjo
bolt awaits its twist of safety wire.
Brake fade is bad, brake failure is a disaster. We have seen complete brake system failure on everything from GP bikes down to club racers. Usually it is due to poor routing of brake lines or improper installation of calipers but often it is as silly as not having the brake pad pins and/or caliper bolts secured with safety wire or other redundant system. For instance, on GSX-R calipers we would drill and tap a small hole next to the brake pad pin which allowed us to install a small Allen bolt, the head of which partially covered the brake pad pin hole. We then safety wired the Allen. With that setup, if the stock clip fell out and the brake pad pin started to back out, the head of the Allen would prevent it from coming out of the caliper altogether. This is, granted, a serious commitment to keeping the brake pad pin (and, therefore, the pads) in place but, on the other hand, we’ve never had one go missing either and we’ve seen what happens when one does. The BMW has a fairly elaborate spring contrivance to hold the brake pad pins but we still throw some safety wire on to back it up.
Brake Bleeding 101
To get the best out of your new lines and pads, you need to eliminate all air from your brake fluid. The steps below describe manual brake bleeding. If you’re using a vacuum brake bleeder (like Mityvac), refer to the instructions that came with the device or check the Internet for instructional videos, keeping in mind that pretty much any idiot with a camera and an internet connection can post videos to YouTube so caveat emptor.
For bleeding your brakes, you will need a handful of paper towels or shop towels, some clear plastic tubing, some new brake fluid, and an appropriately-sized combination wrench.
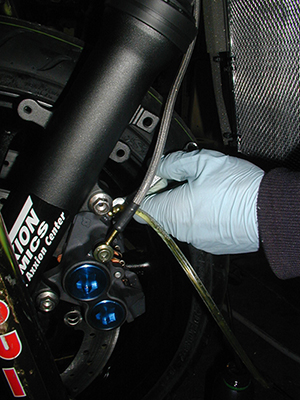
Melissa's blue hand bleeding brakes on an old
school Yamaha.
Brake fluid is extremely corrosive to paint and plastics. We've seen those plastic GSX-R ram air scoops shatter where brake fluid was allowed to drip on them, and brake fluid spilled on your gas tank will bubble and peel your paint like gasket remover. So before you start bleeding your brakes, make sure that you have covered any painted or fragile surfaces that may be in the splatter area.
In order to avoid unnecessarily pushing all of your old fluid all the way through your brake lines, remove the reservoir cap and suck out all of the fluid from the reservoir. You can do this with a Miteyvac, shop towel, or paper towel, but if you're using a paper towel or other lint spreading device, beware of the lint. Lightly place the cap back on the reservoir.
Then, keeping a sharp eye out for anyone who may be tempted to squeeze your brake lever, remove your calipers and push the pistons all the way back into the calipers (after carefully cleaning the brake dust off of them to prevent messing up the seals, of course!) to force more brake fluid back up into the reservoir. Suck that fluid out, and then fill the reservoir with fluid from a newly or recently opened bottle of brake fluid. Beware of opened containers of brake fluid that have been hanging around too long due to brake fluid’s previously mentioned hydrophilic properties. Gently squeeze the lever repeatedly until the pads contact the rotors, and then top off the reservoir again and replace the cap.
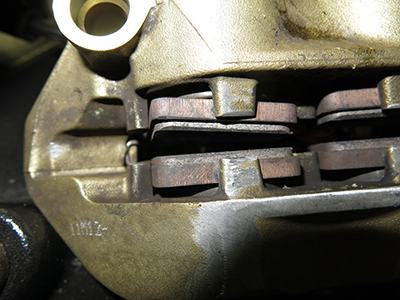
Impressive Vesrah backing plate width uses up a lot of room in the caliper
but, on the upside, they don't warp. Make sure to toothbrush the caliper
pistons clean before retracting them for a pad swap.
Place a paper towel on the calipers right next to the bleeder valve to catch any stray drips that might run down onto the brake pads. Attach your bleeder hose to one of the bleeder valves on one of your calipers and feed the other end into some kind of reservoir - an empty plastic bottle, for instance. Squeeze the brake lever and crack open the bleeder valve using the open end of your combination wrench until the brake lever hits the handlebar. Close the bleeder valve and pump the brake lever a few times until you feel pressure return at the lever, and repeat until you can see the fresh fluid coming out of the bleeder or no more air comes out. Sometimes rotating the wheel with the bike on a front stand will help the pressure come up quickly. Top off the fluid reservoir as necessary. When you are finished with one caliper, repeat the steps for the other caliper, and don't forget to top off your reservoir when you're done but leave enough space for the fluid to expand when it gets hot or you could get an unpleasant surprise when you let go of the lever under hard braking and the brakes don’t release.
If you've successfully bled both lines, you should have a firm feel at the brake lever. If the lever feels spongy or pulls back farther than it should before engaging the brakes and you've already tried adjusting it, you may still have some air in your lines. Air can get trapped at the banjo bolt on the master cylinder itself, or in bends in the lines or in the caliper bodies.
For more aggressive bleeding, wrap some paper towels around the lines coming out of your master cylinder and, while squeezing the brake lever, loosen the banjo bolt at the master cylinder. When the lever comes back to the handlebar, tighten the banjo bolt and pump the lever a few times. If you noticed any bubbles coming out from around the washers or the banjo fittings, repeat until no more bubbles are seen. Some manufacturers are making master cylinder banjo bolts with a built-in bleeder nipple. If you are fortunate enough to have one of these, use that instead of the banjo bolt.
You can tap or manipulate the brake lines while you're bleeding at the calipers to help dislodge any trapped bubbles. You can unbolt your calipers and turn them over and tap on them. And you can loosen your master cylinder from the handlebar and move it around and tap on it to help dislodge any trapped air.
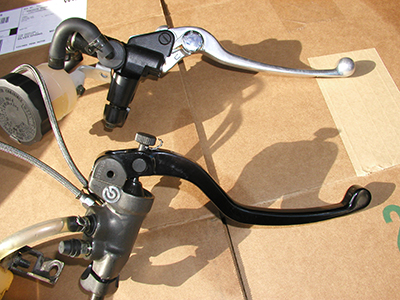
The march of progress from linear master cylinders to radial. However,
some stock radial master cylinder are of such low quality that it is
impossible to get good brake feel with them. If your rules allow for
the upgrade, an Italian after market one will tighten it all up.
If after combining some or all of these methods you are still dissatisfied with your feel at the lever, you may try looking for other causes as noted above, such as warped brake pad backing plates, insufficient brake pad material (worn brake pads), herniated piston seals, or warped rotors. To check for warped rotors, first look to see if the rotor is “coned” or distorted to one side. Coning can be quite dramatic, but usually happens only to rotors with offset carriers or mounted to a YZF 600. One day at Summit point we coned three sets of YZF 600 rotors because we got them so hot that the crystals in the steel reformed to be more compact and the rotors shrank onto the floating buttons and coned over to the side. A dial indicator with a magnetic base mounted on a front stand is useful for checking for minute changes in runout at the track.
CAVEAT #1: Do not allow the fluid to completely drain out of the reservoir or you will pump air into your lines and make your life a living hell as this is most likely to occur at the least convenient time, such as the 5 minute board. Monitor the fluid level closely in the reservoir as you are bleeding and top off frequently.
CAVEAT #2: Do not use the closed end of the combination wrench to open and close the bleeder valve. It's too easy to forget to remove the wrench from the bleeder if you get sidetracked or distracted, for example, by the social responsibility of needing to simultaneously update your Facebook status while live-tweeting your bleeding, and the potential for disaster on the track is much greater if your bike has a wrench hanging onto the front caliper waiting to get thrown through a radiator or under a rear wheel. If you use the open end there's no danger of accidentally taking an unwanted hitchhiker out onto the track.
CAVEAT #3: Always squeeze the brake lever first before loosening a banjo bolt or opening a bleeder valve. This will help prevent air from entering your brake system at the bleed point. Always close the bleeder valve or tighten the banjo bolt before letting go the lever, or you surely will pull air into the system past the threads of the valve or the bolt washers.
Brake Bleeding 201 – Bleeding an Empty System
Bleeding brakes after completely draining them (for example, after brake line replacement or a caliper swap, etc.) can be easy or incredibly frustrating.
After reassembling the system, bolt the calipers onto the fork legs. Crack the bleeders open and gently squirt in a little compressed air to extend the pistons and pads out to the rotors. Hook up your bleeder hoses to the calipers and leave the bleeders valves opened. Put a cable tie on the brake lever to hold it at half pull and pour fluid into the reservoir. The fluid should flow through the lines and into the caliper.
When only small bubbles are coming out of the clear bleeding hoses, shut the bleeder valves and proceed to bleed normally, remembering to bleed the top banjo bolt towards the end of the process as well.
Once all that is done, depress the brake pads and pistons back into the calipers and then extend them again to the rotor using only small 1/5 pull strokes on the brake lever. This will prevent the seals in the calipers from getting over stretched and will help reduce brake drag from the pads dragging on the rotors.
